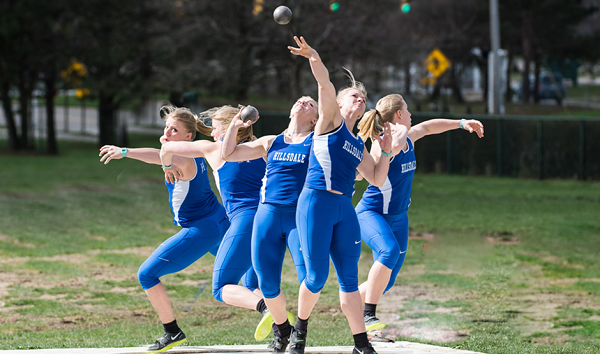
Shot Put – Rotational Style
About Placement and Grip
Shot should be placed on the upper pad of the hand. Fingers should be placed all close to the shot. Positioning of the shot is generally maintained behind the point of the jaw and below the ear by the spinners. This type of positioning of the shot is necessary to counteract the centrifugal force that tries to pull the shot away from the neck of the thrower.
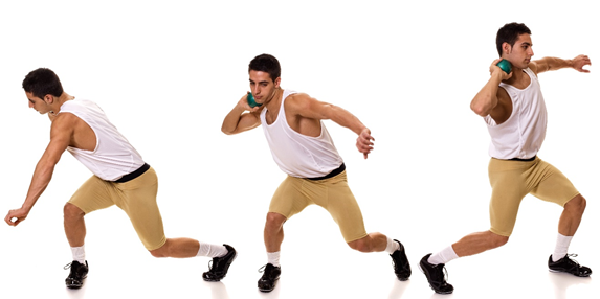
Double Starting Position
The initial positioning in this type of starting method is similar to that of discus throw. Single support phase should be initiated from a viable double support technique. To establish a dynamic support, the CM should be positioned over the base of single support. Position of hip and shoulder is important during this phase. They should remain in horizontal position with respect to each other.
First Single Support Phase
In this case, we have to concentrate upon two aspects very carefully and they are −
- Drive or supporting leg action
- Swing or free leg action
The initiation of the supporting leg is important while the performer lines up in the throwing direction. The leg should be driven off the phase with excessive force. The push off of this drive phase is marked smaller as compared to that of discus techniques.
In case of free leg action, swinging of the leg action should be made in an aggressive and dominant manner in the outset of single support. This means the swinging action should be made once the leg clears the ring. The swinging leg creates an impulse, which in turn creates a force and it is most important factor in rotational style shot put. This also depends upon the movement of torsion and the throw.
Phase of Non-Support
After completing the push offs, the driving leg should be adducted. A thrower should also keep in mind that after the leg swing, it should be actively inverted. In case of no support to aid the rotation of the athlete, shortening of the free arm should be made. Otherwise you can maintain the position that you have achieved at the end of single phase support in case of non-phase support. Now let’s discuss about the re-contact second single support phase.
Re-Contact Second Single Support Phase
The axis of the foot should be maintained within the range of 270-315 degree. To reduce the friction, re-contact of the swinging leg is done through a soft turning. This type of move is also helpful in creating a reflex and stretching in case of free leg action. To slow down the upper body, the free arm should move out from the body in a way to maintain the torsion between the shoulder and hip axis.
Second Double Support Phase
Second double support phase is nothing but an initiation of the power position. Let’s discuss about some power position difference between the rotational and glide techniques. In the middle of the circle, the technique of power position for both glide and rotational is same. The posture of trunk is less vertical in case glide technique as compared to rotational technique. Various techniques of glide type utilize a broader base whereas in case of rotational techniques, a phase of long drive is used.
Sequence of Delivery
First of all, the position of the torsion should be maintained in between the hip and shoulder axis. Thrower should turn in the direction of the throw. Unwinding of the torsion should take place when the hip axis makes a perpendicular direction with respect to the throwing direction but the position of the implement should not change this time.
Then a final step of jumping should be made. Soon after jumping, as the ball has been lifted above, a slapping action should be followed. The movement of your hand should be behind the shot and try to keep contact with the shot as long as possible.
