There are steps to learn archery. Any amateur can easily be proficient in this game but to learn it, play it, and be a better sportsman, archery needs to be practiced regularly and under supervision.
Let us go through the basics of how to play and grasp the joy of archery.
Requirements
Every player who is willing to take part in archery should make sure their vision is sharp and that they can see the target. This has to be the first step to consider for any archer. As the targets are far away and very small, it takes keen observation power to hit the target.
The other things needed are a bow, arrows, and guards for protecting various body parts from hurts and injuries during the game.
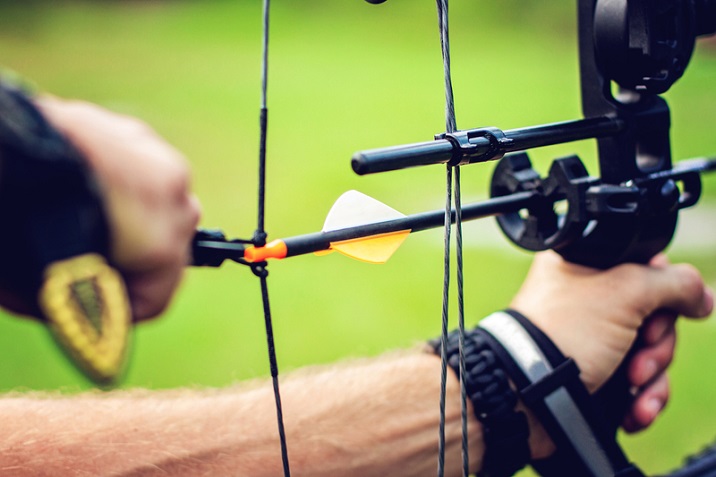
Costumes and Equipment
Mostly, the players suffer minor injuries on their wrist areas and fingers when they release the arrow. Hence, protection for arm, fingers and chest must be put on before entering into the game.
Choose a bow that is suitable for you, and is comfortable in your grip. Arrows are prefixed with some length and sizes. Once you select one, get ready to launch the first arrow.
Before You Start
The first step to do before you get started is to stretch the body. Stretching is compulsory to avoid a pull of the muscle. To avoid any injuries that might hurt the arms, elbows, and shoulder muscles and result in severe pain, the players are advised to do some basic stretching before the game.
All dangling objects including earrings, loose clothing should be removed. If the player possesses long hair, it should be tied back for precautions.
The next step is placing the arrow in the dent attached to the string. The string is generally made of synthetic material, so fingers need a tab for protection from minor cuts. The rubber-rest holds the arrow over the bow and it’s the responsibility of the player to make sure that it clicks the rest. The arrow must not come loose.
How to Hold the Arrow
While the arrow is on the dent and the string is stretched, make sure that index finger is placed above the arrow, with the middle and ring fingers below the arrow. The little finger and thumb should be placed away. Make sure they never touch the string. This enables the free movement of the arrow without putting any pressure on it.
Now it’s time to release the arrow. Gently, the string should be pulled back such that it touches the tip of your nose and your hand is below your jaw. If you feel your muscle tensed, then ease it back and make sure to warm up the muscle and your arm.
Aiming
There is a sight located on the bow for aiming the target. Learn to use the red dot that is in the middle, and the picture which is at the centre of the target. Never hold the stretched string for more than 4 seconds.
This may end up in losing the target and stretching a muscle, causing severe pain and shivering in the hand. Try using the back muscle instead of the arm, for holding the bow. Try to close the left eye to avoid any distraction in locking a view on the target.
Now, slowly ease your fingers away from the stretched string, and maintain a stance while the arrow whistles through the air. To loosen the muscle, try to breathe three times after releasing the firm grip.
Make sure that during the first few attempts, your instructor stays beside you to teach you the basic necessary steps. However, some basic steps can be achieved only through practise and personal advice. The best archers were once beginners and would happily tell you that this sport works on the principle of striving for perfection. The attitude must be to learn, rather than compete.
Only after a great deal of practise, the art of archery can mastered. After going through the basic level training, make sure these skills are practised well, acquainted and applied with every arrow that is shot from the bow.
Scoring and Winning
There are two types of scoring in archery that depend on the level of game conducted. They are 5-zone and 10-zone scoring −
- 5-zone Scoring − In the former one, the target is divided into 5 different coloured zones and points are awarded according to the level the arrow hits. This method is followed in GNAS rounds and the distances are measured in yards.
- 10-zone Scoring − The 10 zone is divided into 10 scoring zones, where each colour is spilt into two parts the inner ring and the outer ring. For world archery,10-zone scoring method is used. This is used in most indoor archery and the length is measured in meters.
The scoring is in even number order. The image shows the location wise scoring given to the landing of arrows.

How to Aim the Traditional Bow
The modern bows have sights and other equipment that help the archer to locate the target with ease and deliver the shot better, which results in a better performance. While using a traditional bow, archers find it difficult to target a point as it doesn’t allow any of these extra features on the bow.
The instinctive shooter’s focus should be especially fixed on the target. We know that peripheral vision can pick up cues that are away from the target, but an intent and focused mind doesn’t take a note of them. A reference shooter may explain the aiming reference, but that cannot be expected from an instinctive shooter.
Reference Methods
All reference methods are based on determining the point where the bow setup is placed while shooting. The point on distance is where the trajectory of arrow and the shooters’ line of sight shall meet. This point on distance varies from shooter to shooter.
The point on distance has an impact by the following features like arrow length, arrow speed, hold on the string, anchor point, etc. Shooters who love targeting long distances develop longer point of distance to lower the hold on far targets.
Split Vision
The split vision is the awareness of arrow shaft and adjusting to the wind-flow. Referring to many shooters, this split-vision is merely based upon the sight picture. Under a keen observation, the arrow and the riser are aligned in such a way that they line up to the target.
Various Gaps Method
The visual gap actually can be the distance between the shooter and the target itself. This depends on the shooter’s knowledge on the arrow’s trajectory at various timeframes till the point on distance is reached. Most archers pick up a point either above or below the target to coincide with the amount of trajectory that the arrow needs to compensate for gravity, while taking the arrow to the specific spot.
Pick up a Point
In this system of shooting, the archers select a point on the target and also calculate the trajectory of arrow, how high or low the arrow makes an impact along the path. This is same as gapping the target. The major difference is only the focus which remains constant. In a whole, the shooter tries to hit a certain spot using the point, but the trajectory takes it to a location slightly above or below the point.
Short Gap
In this method, the archer visualizes the target as a spot slightly above, or directly in front of the arrow. It seems like painting while the arrow is actually the brush. This is a bit harder to few people as the brain visualizes in 3D and the target needs to be seen as a picture.
Shaft Gapping
In this method, the archer needs to know how to use the diameter of arrow shaft. The shooter utilizes the arrow shaft to measure the gap towards the target. This is mastered through vigorous practise that includes observation and concentration.