Shot Put – Glide Techniques
Apart from traditional styles, new rotational styles were introduced in the sport due to increasing popularity. Spin method was also introduced later. Glide techniques also became a part of this and soon became quite popular.
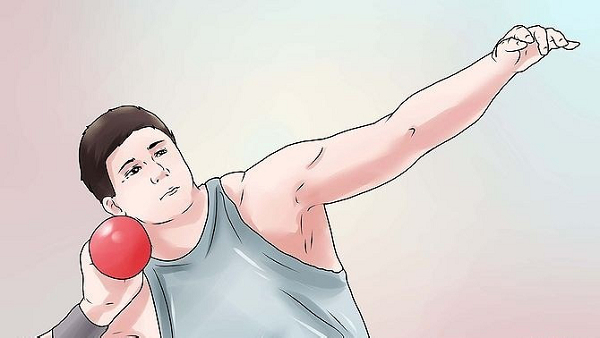
Gripping Mechanism
The main thing to master in this is the placement of the grip. First shot should be placed on the upper pad of the hand. Fingers adjustment is another important factor. All fingers should be placed on the shot. It is a general practise to position the shot safely under the chin. Its exact position is at the starting point of jaw and just below the ear.
Starting Techniques
There are generally two types of starting techniques that can be implemented. They are −
- Crouch start
- T and Slant T start
Greater stability over the performance can be achieved through crouch start. There will also be a consistency in the performance which is a bonus factor. But to practise this type of starting, you need a good strength over your legs. T and Slant T start give a good conversion of velocity through mechanical displacement.
In this type of starting method, we actually do the vertical displacement of the body and convert it into the horizontal velocity across the ring. An athlete will require technical consistency for this. Perfect level of timing is also required to execute it flawlessly.
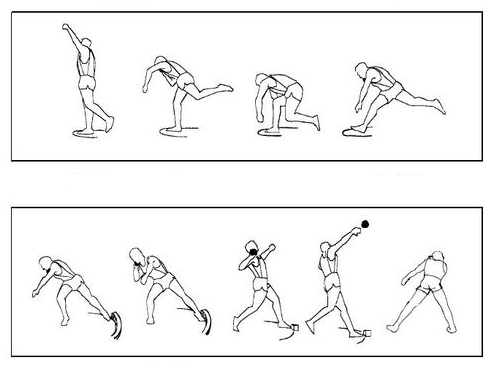
Extension of Leg
To project the ball fully in erect position starting from below, the athlete needs to stretch his leg fully in the corresponding direction and angle. It should be placed at the back side of the circle and if possible should be bought towards the centre of the circle. While extending the extension leg and driving leg, the lower abdomen should make contact with the upper thigh. Let’s go through some of the important points about the extension leg.
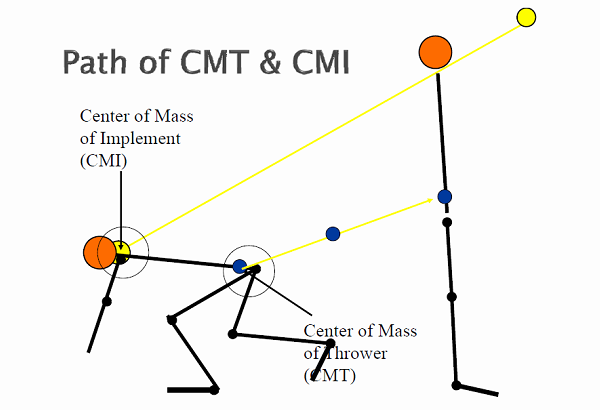
During the stage of initial single support, an athlete should balance his position and starting movements with the use of free leg. There should be an identical position of flexion between the free leg and the supporting leg. To make the extension leg’s target higher, one should lower the Centre of Mass below the stance’s support in the backside of the circular region. Free leg extension should be targeted in between a particular range. This is generally from the toe board (0 inches) to 18 inches.
As we do the complete extension of our legs, the hamstrings store the elastic energy. This is useful in the recovery of driving leg at the centre of the circle. At the backside of the circle, the CMT’s height determines the height of the free leg extension.
Now let’s learn some important aspects about the direction of the extension leg, because this is going to determine the direction of throwing line.
-
Extension should be made along with the left sector line.
-
Driving the free leg in straight across the circle is another better way of treatment for the extension leg. During this time, your supporting leg’s movement should be towards the right side of the circle by going through the central line.
-
During each technique, the foot position in the circle keeps varying. However, the axis alignment of the hips and shoulder should remain in line with the foot.
-
For a standard alignment, the heel of the foot of the extension leg should be aligned with respect to the left sector line.
-
For non-standard alignment, the toe of the extension leg should be aligned with the centre line of the circle.
